How to Defeat Grimhorn in Horizon Forbidden West

Horizon Forbidden West can really turn the tables on Aloy in an instant. The Plowhorn is a machine that can be quite hard to deal with. Anything with four large horns and a sharper fifth one is, really.
But the Plowhorns are the least of Aloy’s worries once rogue subordinate HEPHAESTUS enters the mix, creating the first Grimhorn. With a whole ton of offensive capability slapped onto the already dangerous Plowhorn, the Grimhorn can be a handful for the uninitiated. Thankfully, it is a very rare appearance in the game, almost exclusive to story missions.
Triceratops? Three Times the Fun!

The Grimhorn can first be encountered while Aloy helps the Utaru tribe heal their Land Gods, which just happen to be malfunctioning Plowhorns. One of these Plowhorns falls prey to HEPHAESTUS and is outfitted with offensive modifications that make it a Grimhorn.
SUGGESTED: How to Defeat Slitherfang in Horizon Forbidden West
With a host of charge attacks, slashes, streams of fire, ranged explosions, and area-of-effect attacks, the machine brings an arsenal to any encounter. It only makes sense that Aloy does too. It is effective at melee and long-range and easily varies between the two, its speed and agility allowing it to direct the flow of combat.
It has a lot more protective plating than a Plowhorn. It wasn’t just a paint job HEPHAESTUS slapped on. With a whole lot of offense and defense at its disposal, the machine can be very intimidating indeed. Thankfully, we’re here to help.
How to Defeat Grimhorn in Horizon Forbidden West
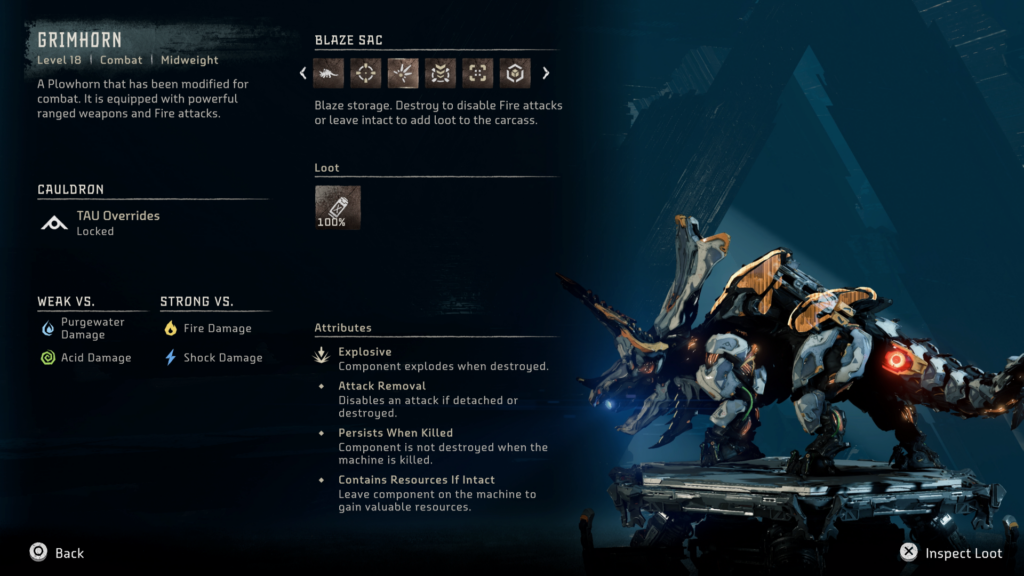
As always with Horizon Forbidden West, analyzing the machine’s strengths and weaknesses can enable a tactical approach to the fight. Acid and purgewater work wonders against Grimhorn, affecting its armor and fire weapons, respectively. There are several weak spots for you to target that have various negative effects on the machine, allowing you to gradually wear it down.
SUGGESTED: How to Defeat Tremortusk in Horizon Forbidden West
This fight is about keeping your distance and creating the space for attacks, chipping away at the machine’s defenses to let you attack weak spots in fast succession. Owing to the machine’s speed and rapid charging attacks, it becomes important to always keep it in view to better respond to its attacks.
At the front of the machine are its Horns, a crucial part of its fire attacks. These can be detached or destroyed to seriously impact the effectiveness of the its fire attacks. To disable them entirely, Blaze Sacs along the machine’s spine can be detonated to turn its firepower back at it while giving Aloy some much-needed breathing room.
Your next target should be the Mounted Mortar, the source of the machine’s Cluster Bomb attacks. While it can be a little hard to target, removing it is worthwhile as the enemy is then left with no other options than its charges and swipes of its tail in melee range.
And finally, the Tail Clamp and the Tail Capsule it protects can be targeted for massive damage. These components can be targeted almost constantly from the beginning of the fight, but the fire attacks make it hard to be consistent with your hits. Best save it for after you disable fire attacks on the machine. With all of its systems now in disarray, the machine soon falls to Aloy’s newly found arsenal and skills.